 |
| Move your Programs from C to any Drive: Intelligent Computing |
For any Reason have you ever wanted to change the application path or want to use all your software after installing new OS and not installing those apps again, make all your programs independent of your OS drive.
Greet to my readers, in last post we discussed about how to optimize your Laptop to getalmost 140% backup. Before starting this post let me make you in situation where you’re Games, heavy working programs have took all the space of your primary drive like C and all your drives have lots of space. This will defiantly reduce your PC’s performance, you are left with two options, either you need to clear up the heavy programs, or you can extend the C drive space from other drive or say free space.
Another situation is you are having lots of programs, you don’t have their setup right now and you need to re-install Windows.
Another situation is you are having lots of programs, you don’t have their setup right now and you need to re-install Windows.
You will defiantly be empty after your new OS. So all you have to keep your application from C drive and save it to another drive. This is the best you can do. So in this post I am going to tell you how you can move all those application from C drive to any drive you wish with their local data and settings making appropriate changes in registry too.
This utility application will do all those things in minute. All you have to do is to download and install this application called Application Mover.
Step 1
Step 2
In main Windows of the utilities you can see mainly two browsing path, called current path and new path. Select the appropriate path for the programs you wish, and select the new path. You can create the new path in drive D or any called Program files and use this as your new path.
Step 3
Leave those all check boxes untouched and Click on the OK bottom at the bottom.
Step 4
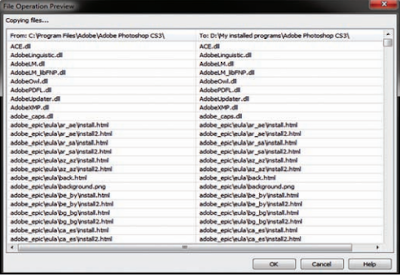
In the very next screen you will notice a confirmation to move the required files, give your permission by clicking OK and proceed.
Step 5
In the final screen you will again ask to confirm the file replacement, agree and let it go on. You can select the check box ‘Do not ask me again’ box and click Replace.
Now let the application work, it moves all the files under the directory and sub directory you chosen making appropriate change in registry and Windows shortcuts along with the .ini and install.log files.
You will notice the following action under the Re-
> Files are copied to new path
> Registry changes are made
> Shortcuts are changed
> Files deleted from Old path
> .ini and install.log files are changed.
|
This utility is shareware and can be purchased for around $ 13-15.
|
Another option for Application mover is Steammover, but this has some cons, it will run only under Windows vista and Windows 7. It support only NTFS not FAT or FAT32. It also don’t move shortcuts from C to another drive, you can do it manually will take around 10 minute.
Do and Don’t for this
This program require Administrative privilege to Run.
Do not move important directory like C:/Programme files/
Do not moves C:/programme files/comman files/
Avoid Moving the Antivirus programs and Office programs [it’s not safe but you can do it at your own risk to try]
Take backups to avoid mishaps.
Before doing operation, all the programs moving must be closed/shutdown.
Do not move application from one to another computer.
Do not run it over the network
The Bottom line
And the bonus tip, if you are about to install new OS you must backup the registry for these programs and merge in your new OS to avoid the clashes. You can tale the backup of My Document manually for some local data of programs, like your Game’s progress are saved there. For those you can use file and setting transfer option on your Windows. Hoping you got something new, having any suggestion or Doubt, don’t wait comment and tell us.
Subscribe Author for Updates
http://Inteligentcomp.com


